


Thursday, November 17, 2011

Located on Berjaya Hills in the state of Pahang, Malaysia, The Chateau rises majestically amidst a lush tropical rainforest and is inspired by the 18th century medieval ‘Haut Koenigsbourg’ castle in Alsace, France.
Offering a complete organic experience, this breathtaking and picturesque destination spa and resort offers impeccable service coupled with unsurpassed hospitality standards. Boasting 200 elegant rooms and suites, each one is tastefully appointed and environmentally friendly with organic bed and bath linens as well as room amenities.
The Chateau caters to a discerning clientele in search of a destination spa which provides the ultimate in health and well-being enrichment.
The award-winning L’assiette fine dining French restaurant prides itself in providing its guests with a mouth-watering degustation menu which will excite any gourmet’s palate. Selecting the freshest produce from around the world as well as those grown in its very own organic farms, The Chateau’s team of chefs creates organic as well as non-organic gastronomical cuisine with a mind to well-being.
To start planning your wedding here, please call 012-295 8025 or email to info@bestevents-asia.com.

Bienvenue chez The Chateau!
Surrounded by a beautiful landscape, tall trees, cool air, classy French setting. This could be YOUR wedding venue cum spa destination. Lo...

With daily duties and never ending workloads, you might not have gotten around to planning your year-end party yet. Best Events has a way out for you (provided you book early!). With four themed packages to choose from, you can now breathe easily.
Packages are catered for groups of 80 pax and include:
BBQ Dinner
Themed Decor
Themed Entertainment
Sound System
Photographer with Photo CD
Packages start from RM20,000 (for KL and PJ areas only)
Packages start from RM20,000 (for KL and PJ areas only)
Themes:
The Chocolate Factory
Welcome to the magical world of ‘The Chocolate Factory’. This is your golden opportunity to embark on a mysterious and fantastical adventure.
As you enter through the black iron gates, Willy Wonka will invite you into his factory of fun and frivolity where ‘nothing will be what it is, because everything will be what it isn’t’.
Winter Wonderland
Beautiful sights and sounds await your guests at a ‘Winter Wonderland’ themed party. In the venue, snow is glistening; seasonal music will have everyone listening, and festive fun is on the agenda for the night!
Adventures in Wonderland
Adventures in Wonderland
Heroes and Villains
Step into the scenes of a ‘Heroes and Villains’ event and you will find yourself amidst an uncanny battle between ‘good’ and ‘evil’. The question is – which side does your Alter Ego lean towards? Are you a ‘goodie two-shoes’ or a ‘baddie’ too big for your boots?
For more information, call 012-295 8025 or e-mail to info@bestevents-asia.com.
Photo Credit: La Flaire
Year End Party Packages
With daily duties and never ending workloads, you might not have gotten around to planning your year-end party yet. Best Events has a way o...
Wednesday, November 16, 2011

MYTH #1 "IF I HIRE A WEDDING PLANNER I LOSE CONTROL OVER MY OWN WEDDING"
FACT #1 = A good wedding planner will never step in and completely take over.
We know that brides want to be in control and enjoy the planning process.
This remains the case if you hire a wedding planner. Lets put it this way, when you buy your first home, you get a real estate agent to help facilitate the process. They don't choose the house for you! The same applies here. It's your wedding day and every decision is yours to make.
A wedding planner acts as an agent and works on your behalf. They will facilitate the process, take care of technical aspects and offer advice. But it is still and will always be YOUR DAY!!
MYTH #2 = "I DONT NEED A WEDDING PLANNER MY FRIENDS AND FAMILY ARE GOING TO HELP ME!"
FACT #2 = Yes, of course, they will! That’s what family and friends are for, right? However, regardless of how many parties they have planned on their own, nothing compares to planning a wedding and the amount of work that goes into it. You want the day to be perfect as it is the most important day of your life. A professional planner is usually a specialist with years of experience. Friends and family have opinions and plenty of ideas but not necessarily the “KNOW HOW” and skills needed to make sure things fall into place, nor do they have the contacts of the best reliable suppliers in the wedding industry.
As seen on a website "“Friends don’t let friends set up. Or teardown. Leave that to the professionals so you can celebrate with your loved ones. After all isn’t that what weddings are really about?"
MYTH #3 = "I DON’T NEED A WEDDING PLANNER, THE VENUE I CHOSE HAS A WEDDING COORDINATOR INCLUDED IN THE PACKAGE"
FACT #3 = Yes, most venues have their own event/wedding coordinator, who work for the venue but not for the couple.
A wedding coordinator from a venue is generally one whose duties are for the day of the wedding. His or her duties include making sure that the banquet staff have set up the furniture, food and beverages as planned and that the stage is ready. Having a wedding planner means that the wedding is planned properly from start to finish and works only for the bride/bridal couple.
Most event/wedding coordinators that work for these venues are professionals and have extensive experience in this industry and will coordinate all that concerns the venue.
They won't be able involved in the whole wedding process and will usually have a fixed list of vendors appointed by the hotel with only the interest of the hotel in mind. They won't be organizing all the wedding suppliers on the day and ensuring that the vendors stick to the plan.
MYTH #4 = “I DON’T NEED A WEDDING PLANNER, THERE ISN’T THAT MUCH WORK TO DO.”
FACT #4 = PLANNING A WEDDING IS NOT A GAME AND WILL PROBABLY BE THE BIGGEST JOB YOU WILL EVER UNDERTAKE IN YOUR LIFE. Most couples think that once everyone has been hired and all the elements have been booked and paid for, the wedding is done. If only it were that easy.
Your wedding planner may look composed when around you or your family but believe me, she's got a million worst-case scenarios running through her head and lots of fire-fighting to do while making sure that the couple get ready in time for rehearsals, makeup and hair, photo sessions and the actual Walk In. Her job and reputation are on the line if anything goes wrong. She's paid to make sure everything runs smoothly to make sure YOU enjoy your day without worry. A professional wedding planner works in the background overseeing the whole event (not unlike a Puppet Master!) while her crew are "her hands" taking part in the action.
MYTH #5 =” Wedding Planners Have a Wealth of Information That They Just Give Out Freely To All and Sundry”
FACT #5 = “Wedding Planners do have an abundance of contacts, tips, knowledge and information therefore we get paid for our expertise as we are professionals in our field. When you call a lawyer, you are willing to pay for his advice and knowledge. He, too, has worked long and hard to be a professional in his field.
A professional planner spends years establishing contacts with the best suppliers in the industry, forming relationships with them and creating a network that is trusted. This is all done so that the planner can save their client “The Bride and Groom” not only time and money, but always ensuring the best service is delivered, paying attention to reliablilty and quality to suit the clients needs and budget.
The client is buying the planners expertise, knowledge and time, not just their phone book.
- Tanya Gageiro, Memories 4 U and adapted by Best Events
I Don't Need a Wedding Planner- 5 Myths Debunked
MYTH #1 "IF I HIRE A WEDDING PLANNER I LOSE CONTROL OVER MY OWN WEDDING" FACT #1 = A good wedding planner will never step in ...
Friday, October 14, 2011
Siblings Kumar who turned 16, and Visha who turned 21, celebrated their birthdays together last month. With the rented house decorated with whimsical bohemian elements, guests were entertained by various forms of dance, tattoo bars, tarot card reading, and walkabout magician.


More Photos at www.facebook.com/BestEventsAsia


More Photos at www.facebook.com/BestEventsAsia
Event Report: A Bohemian Birthday Party
Siblings Kumar who turned 16, and Visha who turned 21, celebrated their birthdays together last month. With the rented house decorated with ...

900 guests of YBhg Dato AK Nathan and YBhg Datin Puspa, parents of Narish, the groom, were invited to this wedding hosted by YBhg Dato Mahadzir Lokman. While waiting for the King and Queen of the day to get ready, guests mingled outside while listening to a jazz quartet and posing beside "Narish and Shaline".
Doors opened an hour later, and guests were entertained non-stop by an orchestra, violinists, Magic Quick Costume change, Sand Art performance, Comedy Court and even a Broadway dance show and capped off with a bootie shaking time led by DJ Alex.


More Photos at www.facebook.com/BestEventsAsia
Event Report: A Winter Wonderland Wedding
900 guests of YBhg Dato AK Nathan and YBhg Datin Puspa, parents of Narish, the groom, were invited to this wedding hosted by YBhg Dato Ma...
No party is complete without entertainment. With Halloween around the corner, here are some games to keep your guests entertained, courtesy of Martha Stewart and games from the web.

Pin The Pumpkin Face
Any child who has played Pin the Tail on the Donkey will pick up this game quickly. Cut out eyes, noses, and mouths from black construction paper. Stick a reusable adhesive, such as Blu Tack, on the back of each cutout, and give a set of cutouts to each player. Place a large pumpkin on a low table or a bench. With blindfolded players starting four feet away (little kids may stand closer), instruct them to walk toward the pumpkin and create a jack-o'-lantern face (without peeking). After each turn, take a picture of the player with the finished pumpkin.Pin The Pumpkin Face
Bat Pinata

This bat pinata, created using the technique of papier-mache, is creepy enough to be the center of your party decorations. Just be careful after dark; he might swoop down and give you a fright.
Tip: When using black tissue paper, wear gloves and cover your work surface because the dye may run and stain

Step 1
Paste Layers of Tissue Paper on Balloon
Begin by resting a large balloon on an empty jar (this will prevent the damp tissue from discoloring or sticking to the work surface). Dab diluted craft glue (2 parts glue to 1 part water) on a small section of the balloon, and cover with two full layers of newspaper. For each strip of paper, apply glue and overlap each one slightly before brushing on more glue. After the second layer, tie a long piece of string around center (this will hang your pinata), then continue with 2 more layers of newspaper, followed by black tissue, from the balloon's crown to its knot. Repeat for small balloon (this will become the bat's head), but don't include the string.
Note: This picture is meant to illustrate the technique, but you will be using newspaper and black tissue paper, rather than orange tissue paper, for this project.

Hang to Dry
Using clothespins, hang the tissue-covered large and small balloons from the clothesline by their knots; let dry completely (several hours or overnight).

Step 3
Cut Hole for Candy
Cut a hole in top of body (the large balloon) with utility knife, and save the piece to use for ears. Pop the balloon by making a slit with scissors next to the knot; remove. Cover cut edge with tissue and fill the body with wrapped candy.

Step 4
Assemble the Bat
Pop and remove the balloon from smaller piece. Place small sphere (the head) onto large one (the body). Drape several layers of black tissue paper over the head toward the body and around the neck, brushing with diluted glue until neck is secure. Let dry. Draw a bat's face onto white card stock. Cut out features; attach with undiluted glue. Cut ears from reserved piece; glue in place.

Step 5
Make the Wings
Sketch large wing shapes on black poster board, and cut them out. Secure wings to the sides of the bat's body with black duct tape. Paste black tissue paper over the joints to cover the tape. Next, use tape to attach a length of string to the end of each wing. (This will allow you to suspend the wings as if in flight.) Cover the tape with tissue paper. To hang the bat, suspend from body string. Then, tack the two wing strings to the ceiling to make the bat look as if it is flying.

Nosey
Halloween games of disguise survive in many old sources, and they don't necessarily involve elaborate costumes. In "Nosey," the party guests are divided into two groups and sent into adjoining rooms. A curtain or heavy sheet with a small slit in it is hung in the doorway. One of the players sticks his or her nose through the slit, making sure nothing else shows. Then the game leader chants, "The witches have stolen somebody's nose. Who does it belong to, do you suppose?" and everyone on the opposing team attempts to guess the owner of the nose. If correct, the guessing team scores a point and the opposing team must present another nose for their regard. If the guess is wrong, then the guessing team must now start offering up noses -- which, it should be noted, can be very hard to recognize without any accompanying features!

Pucker Up
Pucker up....this game requires skill, speed and raw straw-sucking power.
What You Need
Straws
Construction paper
Bowl
Instructions
Before the party, ask your kids to help you cut ten Halloween shapes, such as ghosts, bats and pumpkins from construction paper. Each shape should be about the size of a silver dollar. Place the shapes in a pile beside a small bowl.
Using the straw as a vacuum, each contestant tries to pick up a shape and place it in the bowl to create the Witch's Stew. Time the players to see who can get all ten in the bowl the fastest.
Tips:
Cut out several sets of shapes and let the players race head to head.

What You Need
Skeleton Template
Printer Paper
Craft Foam & Glue, optional
2 Bowls
Poster Board & Double-Sided Tape, optional
Instructions
Before the party, create the parts for complete skeletons (you'll need 1 for each team) by printing them out.
Cut out all the parts. You can glue them onto craft foam or just use the paper parts.
At game time, divide players into teams of 2 or more and place each team's parts in bowls across the room.
At "Go," team members take turns retrieving 1 part from the bowl to build their skeleton. Players can assemble their skeletons on a flat surface or use double-sided tape to stick them to poster board mounted on a wall. The first team to correctly complete its skeleton wins.
Variations:
For an added challenge, put all of the parts together in a single bowl.
Games to Play at your Kid's Halloween Party
No party is complete without entertainment. With Halloween around the corner, here are some games to keep your guests entertained, courtesy ...

Catering chefs are emerging from the kitchen—or wherever they’ve been tucked away to prep the food—to let guests observe the cooking. Or they’re opening up the work space and inviting attendees to join in choosing ingredients and flavor enhancements.
Two of the buzzwords are customization and interactivity, and the point is to integrate the catering into the experience, to give food-crazy guests a chance to try something new. Make-your-own stations now go beyond salads and sundaes to all kinds of drinks, desserts, and entrées.
While often these changes mean putting a more prominent spotlight on the food, the movement away from long, seated dinners or static buffet stations can also allow attendees to focus on the point of the gathering. They can get up and mingle with each other instead of being stuck at a table for two hours. Or they can try out a new product, chat with a business contact, or listen to a presentation while the food comes to them, in waves of small plates passed in courses, or wheeled to them on carts.
With this increased interaction comes more menu choices and innovative presentation styles. Here’s a look at the newest interactive and hands-on approaches from caterers and venues looking to get guests involved with their food.

Create a devil-your-own-egg bar with hard-boiled eggs set on ceramic cartons and mini pails filled with toppings like paprika, caper powder, and chives.

Add a twist to your regular ice kacang to allow guests to customize their ice desserts with flavors including cran-raspberry and mango.

Instead of the usual chocolate fountain, individual fondue cups are filled with warm chocolate sauces, with items like marshmallows, kiwi slices, and strawberries to dip.

A new backpack contraption called the “Rocketman” that straps to the back of a staffer, can serve beverages among mingling guests.

Create a taco station, where guests can decorate homemade tortillas with an array of toppings served in custom-made resin pedestal pieces inspired by handcrafted Mexican pottery.

“Salad-tinis” made by “chef-tenders,” who mix ingredients with oversize drink shakers and serve them in martini glasses.

Create a Bloody Mary bar with ingredients including pickled vegetables, scallions, beef jerky, and rosemary stirrers, plus spicy elements like banana peppers and jalapeños.

A chandelier is lowered to become a 24-foot round dessert buffet.
-Biz Bash
Catering Trends 2011
Instead of sitting down and passively consuming whatever is placed on the table, or grabbing a few passed hors d’oeuvres from whichever tray...
Looking for a new twist for an end-of-the-year corporate gathering? Here are three new concepts to inspire you...

“The concept is a dark twist on the classic holiday fête, using elements of mystery, drama, and Old Hollywood glamour. A speakeasy meets an underground masquerade in a cinematic pleasure palace, and the mood is set with a minimal palette of black and white. Finding a perfect venue is key; architectural details and grand spaces with an oversize fireplace are ideal. Then pools of smoky light are interspersed with gobos casting slatted-blind texture on the walls and floors. A lush tableau of exotic hors d’oeuvres spans the space, illuminated by tiers of candelabras. Reinterpretations of classic seasonal themes are woven into the space, such as a forest of suspended Christmas tree chandeliers, composed of blackened branches and adorned with ornaments. Entertainment is a smorgasbord of vices, including gambling, hand-rolled cigars, on-site tattooing, and private shows by shadow dancers. The soundtrack for the evening is provided by a live jazz band that performs holiday classics.”

Cafe Cafe offers continental European charm and a top class French/Italian menu in a dim, candle-lit nook of Jalan Maharajalela, Kuala Lumpur. This place offers quality French dishes without unnecessary fanfare.

Nothing sets the mood better than an authentic live orchestra and crooning front singer.

“The concept starts with a customized invite to the lounge. Upon entry, snow machines will have people making snowmen as an interactive activity. Inside, white fur-lined linens and fur-capped Chiavari chairs are set against antler candlesticks, votive holders, and fireplaces. Oversize silver frames with wood paneling, alternating with white sheer drapes and a variety of contemporary furniture, provide the groundwork for winter-inspired accessories like large lacquer deer and fur-and-antler-inspired pillows. The menu is cozy and festive, with items such as mixed berry and gingerbread trifles, roasted chestnut truffles, and specialty cocktails.”

“This distinctly visceral experience for holiday revelers challenges their ideas of a classic holiday party. The theme is nautical and fantastical and elegant without losing the warmth and nostalgia of the season. It surprises the guest’s palate and eye—traditional elements are alluded to, but made both contemporary and graceful. Suspended from the ceiling, an oversize octopus mobile with gold sequins will wrap her tentacles around the room to serve as a visual anchor for the space. Subtle hints of red and green are woven throughout this whimsical underwater world to retain the whisper of the season. People leave our aquatic Eden swimming with ideas about how they can update their own holiday traditions.”

Bubbles further intensify the underwater fantasy world.

Theme One: Noel Noir
By Andrew Stevens and Kim Swift, We Came in Peace
“The concept is a dark twist on the classic holiday fête, using elements of mystery, drama, and Old Hollywood glamour. A speakeasy meets an underground masquerade in a cinematic pleasure palace, and the mood is set with a minimal palette of black and white. Finding a perfect venue is key; architectural details and grand spaces with an oversize fireplace are ideal. Then pools of smoky light are interspersed with gobos casting slatted-blind texture on the walls and floors. A lush tableau of exotic hors d’oeuvres spans the space, illuminated by tiers of candelabras. Reinterpretations of classic seasonal themes are woven into the space, such as a forest of suspended Christmas tree chandeliers, composed of blackened branches and adorned with ornaments. Entertainment is a smorgasbord of vices, including gambling, hand-rolled cigars, on-site tattooing, and private shows by shadow dancers. The soundtrack for the evening is provided by a live jazz band that performs holiday classics.”
Rendering: Courtesy of We Came in Peace


Nothing sets the mood better than an authentic live orchestra and crooning front singer.

Theme Two: The Snowball Lounge
By Jaime Geffen & Brian Worley, Your Bash!
“The concept starts with a customized invite to the lounge. Upon entry, snow machines will have people making snowmen as an interactive activity. Inside, white fur-lined linens and fur-capped Chiavari chairs are set against antler candlesticks, votive holders, and fireplaces. Oversize silver frames with wood paneling, alternating with white sheer drapes and a variety of contemporary furniture, provide the groundwork for winter-inspired accessories like large lacquer deer and fur-and-antler-inspired pillows. The menu is cozy and festive, with items such as mixed berry and gingerbread trifles, roasted chestnut truffles, and specialty cocktails.”

Theme Three: The Holiday Aquatic
By Britt Whitfield, Revel Global Events
“This distinctly visceral experience for holiday revelers challenges their ideas of a classic holiday party. The theme is nautical and fantastical and elegant without losing the warmth and nostalgia of the season. It surprises the guest’s palate and eye—traditional elements are alluded to, but made both contemporary and graceful. Suspended from the ceiling, an oversize octopus mobile with gold sequins will wrap her tentacles around the room to serve as a visual anchor for the space. Subtle hints of red and green are woven throughout this whimsical underwater world to retain the whisper of the season. People leave our aquatic Eden swimming with ideas about how they can update their own holiday traditions.”
Rendering: Courtesy of the Revel Group

Bubbles further intensify the underwater fantasy world.
3 Dramatic New Themes for Year End Parties
Looking for a new twist for an end-of-the-year corporate gathering? Here are three new concepts to inspire you... Theme One: Noel Noir...

Calamities happen at trade shows. It’s not a question of if — it’s a question of when and how bad. But when it comes to exhibiting emergencies, you can’t just have a Plan B in mind, you have to have a Plan C, D, and E as well. And if a natural disaster occurs ruining all your backups, well, you need a plan for that, too.
A few years ago, I held the position of West Coast marketing analyst for EquiFirst, a Charlotte, NC-based mortgage lender.
We had just built a beautiful new booth and were launching it at one of our biggest shows. I arrived on site for booth inspection an hour before the show opened, and was not happy with what I found. One of the trade show coordinators told me the can lights that were supposed to run along the top of the booth were broken
and there was no way to get replacements in time. Without those lights, our entire booth looked more like a dark, dank basement than a trade show exhibit, so you can imagine my reaction: I saw red. First of all,
I couldn’t understand why I hadn’t been noti fied of this problem the moment the broken lights were discovered. Second, I just couldn’t accept the idea that there was “no way out” of this snafu.
The truth is, there’s always something you can do to at least try and remedy your situation. So I got on the phone with our exhibit house, told them about the problem, and asked if they had a partner in the show’s host city of Minneapolis. Working with the local exhibit house, we found enough of the lights we needed
to replace the broken ones. Our booth manager drove a rental car to pick up the new fixtures, and the problem was solved.
The last light went up just moments before our senior executives came to see the new booth — in all its illuminated glory. Crisis averted, right? Maybe. But the frustration generated by the situation and the trade show coordinator’s apathetic attitude toward finding a solution spurred me to figure out a way to avoid such a mess in the future. So I resolved to develop a number of back-up plans for some of the most common trade show mishaps. But I would need the help of my team in order to pull off my contingency plans, particularly at shows I don’t personally attend. And while some of us may be born with the be-ready-for-anything gene, not everyone is able to think on their feet when their booth is literally crashing down around them. So, what do you do? You train them.
With that goal in mind, I created in-of fice mini training sessions that I schedule every three to six months. The halfday training sessions are a combination of interactive problem solving, teamwork, role-playing, and brainstorming. I work up three different disaster scenarios, aka“ fire drills,” and ask my trade show team to
figure out feasible solutions for each one. The individuals you invite to participate will depend on your situation, but my teams have included marketing managers and assistants, graphic designers, trade show coordinators, booth staffers, sales reps, and any other internal stakeholders I can wrestle up and convince to attend.
But no matter who’s participating, this is not your typical booth-staff meeting. We do not sit around a conference table for three or four hours and simply discuss the scenarios. After all, when things go wrong
on the show floor, you rarely have time to rally the troops and host a four-hour meeting to decide how you’ll proceed. So to set the drills apart from the daily norm and infuse a sense of authentic urgency,
I e-mail the scenarios to the team members at their desks, and enforce a strict deadline — they have 30 minutes to find a workable solution.
During the first two drills in the three part training session, the members of my team can work together to find solutions to the show-related snafus. The final drill is completed individually.
The following step-by-step method will help you host your own trade show fire drills and train your staff to handle worst-case scenarios, while also arming your team — and yourself — with a laundry
list of contingency plans. And best of all, these simple little training sessions are fun, low-pressure, and no-cost
exercises that just might save the day at your next show.
1. Map Out a Plan
Put an initial plan together, including some ideas for the scenarios you’d like to address, what you want to accomplish with the project, and who will be involved. Then schedule a meeting with your boss to pitch the idea. It helps to have your boss involved with the project as his or her participation indicates that the training sessions are an important part of your program — a message that will likely increase the attendance and participation of internal stakeholders who may not directly report to you.
If you have trouble getting your boss on board, you may want to explain the importance of having contingency plans when exhibiting. For example, you can discuss how, absent a plan B, your exhibit might suffer due to lost graphics or damaged exhibit components. Or, speak the language of dollars and cents, and describe how
a trade show tragedy can bite you in the budget if you’re not prepared with a backup plan. Once your boss sees the kinds of very real problems you may encounter at a trade show — and understands the potential impact to your effectiveness and/or overall expenses — he or she may be more supportive of your plan.
2. Develop the Drills
Take a look at your trade show program to determine what types of re drills to present to your team. I create three drills for each training session, including one drill involving a small 10-by-10 or 10-by-20-foot booth, another for a larger 40-by-40-foot booth, and one for an off-site event calamity. Your scenarios will depend on your individual program. For example, if you exhibit in a 10-by-10-foot booth for the vast majority of your shows, you should probably focus more on small-booth challenges.
Consider including scenarios you’ve personally faced at shows, such as ruined graphics, missing collateral, or delayed shipping, as those issues are likely to hit home with your team. Having said that, don’t be afraid to brainstorm some unusual or natural-disaster scenarios as they will stretch participants to think outside
of the box and learn to deal with problems that range from logistical hiccups to major tragedies.
Once you know what types of scenarios you’d like to include in your training sessions, you’ll need to write them up into detailed accounts that provide participants with as much information as possible. (The three drills found here should help.)

3. Get Ready to Rumble
With your scenarios in hand, it’s time to get your training session onto your team’s calendar. When you send out the meeting invite, give them an idea of what to expect, why the exercise is important, and how it will
benefit them. And assuming you were successful in step No. 1, a note from your boss lending his or her support to the project isn’t a bad idea either. While you can certainly schedule your training sessions to consume more or less time, mine typically run 3 hours in length, with 30 minutes of time for each
of the three scenarios, and a 90-minute review session where we come together as a group and discuss the pros and cons of the solutions they came up with. This format allows the team enough time to brainstorm workable solutions, and only takes up about half of the workday.
Just like in a real emergency, your team members will be able to call on their traditional sources — including your exhibit house, freight contact, internal employees, or a business service center like Staples or
FedEx Of fice — to help nd a workable solution. So once you have a date and time scheduled for your training session, you’ll need to contact each of the sources prior to the drill and let them know they might get
a call. Briefly explain the exercise to them, and ask that they treat the situations just as they would in a real emergency.
4. Ready, Set, Disaster
On the morning of the fire drills, the team receives three help cards, similar to the three “lifelines” on the TV game show,“Who Wants to Be a Millionaire?” The first card is redeemable for an answer to a single question they ask me. They can use the second card to call on the executive who oversees our department for assistance. The last card earns them a 15-minute extension, as long as they request it before the 30-minute drill is up.
I e-mail the first scenario to the team, start the 30-minute timer, and they’re off. I stay out of the picture, usually in a conference room, preparing for the evaluation at the end of the drills. However, I am not above adding twists to make things more challenging. During some of the drills, I make phone calls from the conference room and pretend to be an irate sales manager — or ditzy exhibit-services desk clerk — to throw a wrench into their plans, forcing them to modify their solution and come up with a plan C.
Five minutes before each drill ends, I e-mail the team a warning, reminding them that time is almost up. And
when the 30 minutes is done, I use a small siren I have to signal the end of the drill. As soon as the signal sounds, they must e-mail me the solution immediately. When I receive the group’s e-mail, I send them
the next scenario, and they’re off again.
After the second drill is nished and the solution sent to me, each member of the team returns to his or her desk and receives the final — solo — scenario.
5. Regroup, Recap, and Results
After the staff members complete the three scenarios and send me their solutions, we all meet in the conference room for a 90-minute review session. This is always the most rewarding part of the drill exercise.
I start with the first drill, asking the team members to review the solution they presented and then discuss what works well about it and what they think they can improve. At this stage, I help them develop the best possible solution so if they are ever faced with a similar situation they know exactly what to do. Then we do the
same for the second drill.
For the third, individual drill, we rank the solutions presented by each team member. The premise is that no solution is bad, but as a group we want to choose or create the best, most cost-effective answer. Typically,
the team will cherry pick elements of several different solutions to form a single plan of attack that addresses the problem in the most effective, ef ficient manner.
6. Wrap It Up
After our review session is complete, we compile all of the “best practice” solutions, someone volunteers to put them into an e-mail, and we send them out for everyone to file away for future reference. Over time, team members compile their own fire-drill handbooks, which have proven to be useful tools that have saved the day when team members encounter real-life exhibit hiccups.
For example, when a member of my staff was in the of fice overseeing a remote show in Arizona, he received
call that all the collateral literature had been quarantined by the police. He didn’t know the reason for the quarantine, but was told the literature would not be released until long after the show opened and attendees started filing into the exhibit. Drawing on a past fire drill, he got on the phone with the on-site contractor and e-mailed electronic files of the literature. The contractor took the files to the show’s business center and
had copies made. Problem solved.
The fire drills have even made an impact beyond my own team. A former employee, Jason Reid, called not too long ago to tell me about his own trade show emergency. Reid, who participated in the fire drills when he worked for me at Equi-First, said that periodic rereading of his fire-drill handbook paid off for him at a recent
show. When his company’s booth was missing in action a scant two hours before the show opened, Reid told me he didn’t panic because he had just reviewed an almost identical scenario in the handbook.
By putting the solution from the fire drill to work, the crisis was averted and his booth was ready by the time the show opened.
Always Be Prepared
While I knew I was teaching my employees an invaluable skill that would serve them well in their careers, hearing how Reid put those lessons to good use further validated my faith in the fire drills. I firmly believe that they not only train my team to face whatever happens on the trade show floor, they actually help prevent potential problems from ever erupting. My team members have a better understanding of what can go wrong at the trade shows we attend, and as a result are more diligent about pre-show and at-show preparation.
Hopefully by following the steps above and adapting my methods to suit your program’s speci fic needs, you can host your own fire drills. There is no guarantee that the solutions you come up with in the comfort
of your own of office will solve all the problems you and your team may encounter on the trade show floor, but it’s always best to be prepared. That way, when the next trade show calamity rears its ugly head, you and your team members will have already survived a baptism by fire drill, and have plan B, C, D, and E ready to go.
- Kristen Bostedo-Conway for EXHIBITOR Magazine. Copyright Exhibitor Magazine.
Trade Show Catastrophes- How Ready is Your Team?
Calamities happen at trade shows. It’s not a question of if — it’s a question of when and how bad. But when it comes to exhibiting emergenc...
Friday, August 5, 2011

Maverick TV is making this year’s hit series of MTV’s My Super Sweet… and once again, it’s going GLOBAL and this time they're coming to MALAYSIA!
My Super Sweet will follow one young person’s outrageous journey towards their birthday bash as they plot, plan and prepare for the party of a lifetime.
This year, the show will be bigger, better and more glamorous than ever. They’re looking for sassy, edgy party-hosts who are planning celebrations all around the world. They’ve even upped the age limit and that means they want to get their hands on the key to your 21st, spray lashings of champers all over your 18th and sprinkle sweetness on your 16th.
Out-of-this-world parties are not just for American or UK teenagers anymore. From secret agent parties in England to a Viking-themed party in Norway, and with entrances ranging from helicopters to flying carpets, these are some of the biggest, most extravagant events anyone has ever seen. From London to Europe, South Africa to Dubai and everywhere in between… if you’re having the party to end all parties this year, or you know someone else who is, then we want to know about it…!
Think you've got what it takes to appear on My Super Sweet World Class? Here's your chance! Hire Best Events as your party planner before 15 August 2011 (Mon) and your contacts will be sent directly to the MTV team.
The details:
Only ONE 16th- 25th birthday bash in Aug and Sept 2011 will be featured on the show. Please note that both Best Events and MTV won't be sponsoring your party. The party will be picked by MTV to be featured on the series.
Email your party details to info@bestevents-asia.com for us to start planning your party. Please include your full name, age, contact number, e-mail address, preferred party theme and we'll work out the rest.
Get ready to party hard!Take your cue below!
Video - My Super Sweet World Class 109 Clip 1 - My Super Sweet World Class - This youn...
MTV's My Super Sweet World Class Comes to Malaysia
Maverick TV is making this year’s hit series of MTV’s My Super Sweet… and once again, it’s going GLOBAL and this time they're coming to...
Thursday, August 4, 2011

Nobody, whether they're 6 or 60, can ignore a table of eye-catching confections in bright pinks, peaches, and golds. The assortment of sweets includes pillow mints, Milkies, sugarbonen, jelly beans, malted-milk balls, taffy sticks, macaroons, and more. We adorned simple apothecary jars and the tablecloth with gold thread lace. The sign is propped up with Dresden-foil flowers. Provide glassine bags so your guests can take home a sampling.

Each guest's place is outlined in chalk on a roll of black paper ( tape secures the corners to the tablecloth); single-flower arrangements rest in milk bottles, latte bowls, and ceramic tumblers; votive candles illuminate paper bags trimmed down with scalloping shears.

The old standby wedding favor got a brand-new bag thanks to more than just wishful thinking. Bypassing the classic gauzy tulle pouches masquerading as tiny blue robins' eggs in delicate faux nests, shown here.

Guests will cheer you on when you zip away after the ceremony in a car covered with pom-pom garlands. These decorations are easy to make with tissue paper and twine, and they stay on the car with suction cups, which won't damage the auto's exterior.

Bride Laura Normandin fashioned her breathtakingly beautiful butterfly bouquet from silk and feather creatures secured on thin wires so that they float and flutter realistically.
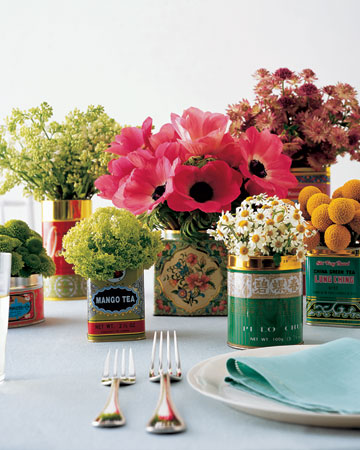
No one expects you to be Martha Stewart -- really; we know you have a life outside of planning for your wedding. But taking on a project (no matter how simple or involved) is a sweet sentiment that will resonate with your guests. Ultimately, the care you put into the things you create is a reflection of the love you have for your family and friends, as well as the life you're creating with your new husband. Here is another Martha Stewart inspiration- centerpieces created from collected tins.

The key to working color's magic is knowing when -- and how -- to use it. For maximum impact, take one color and run with it for a monochromatic effect. It's a chic, pared-down way to express your style. Either showcase many different shades of the same color, drench your decor with a singular hue, or mix in bright white for a modern look. Here, vessels wrapped in silk dupioni and overflowing with tulips, carnations, and roses are scattered across a crepe-paper runner; a flurry of paper lanterns float overhead.

Here's a surefire tearjerker and chortle-inducer -- a gallery of childhood snapshots. Let the world see the braces, the bathtub moments, the eighties fashion. (Of course, no one will blame you for sandwiching in recent, more attractive pics.) A thin layer of foam board is attached to a folding screen with spray-adhesive, and mint green cloth is affixed the same way inside the border. We crisscrossed white satin ribbons across the board (gluing them along the border), placed map tacks at intersections, and tucked photos behind them. Guests searching for their table numbers will surely walk away from this display with smiles on their faces.
Source: Martha Stewart
15 Years of Great Wedding Ideas We Like
Nobody, whether they're 6 or 60, can ignore a table of eye-catching confections in bright pinks, peaches, and golds. The assortment of s...

